Caterer App Documentation
Tagline and/or comments...
- Version: 1.0
- Author: EvoMorf
- Started: March, 2023
- Update: April, 2023
Product Manager
The tasks that you can do in Product Manager are:
- View the Products List.
- Edit/Delete a Product.
- Assign/Unassign the products to Bar Counter/Counters.
- Add a new Product.
- Edit/Delete Sub-Categories.
- Add a new Sub-Category.
- Sort the Sub-Categories.
- View the products assigned to Bar Counter/Counters.
Product Manager has 3 Tabs:
- PRODUCTS Tab
- CATEGORIES Tab
- MANAGE Tab
PRODUCTS Tab
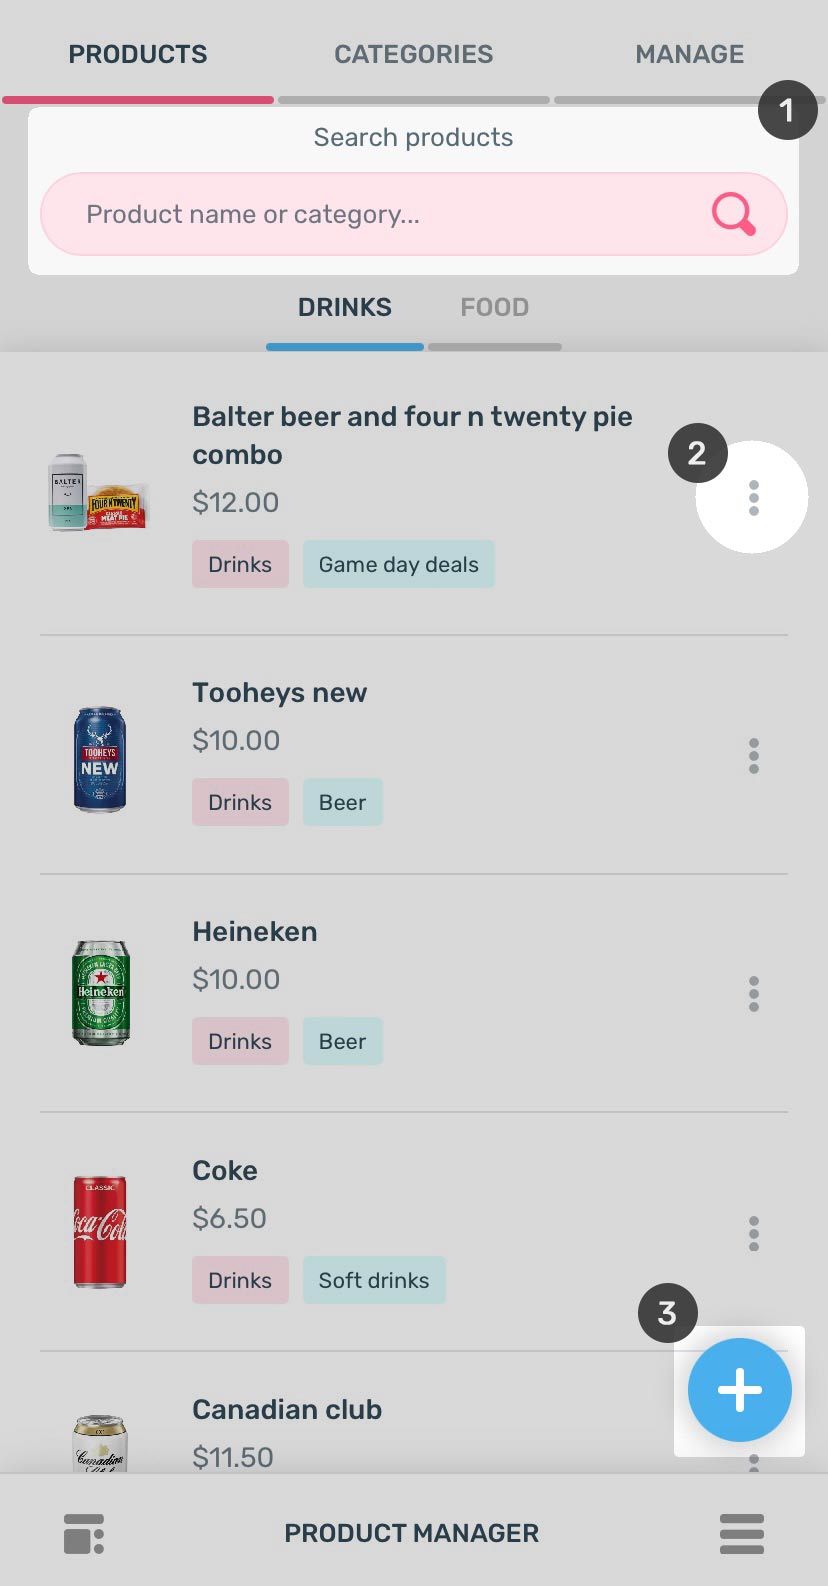
- SEARCH Products or Category:
- TYPE the product name or category name or sub-category name in the SEARCH BOX to find the desired product/products.
- Or SCROLL through the list of all the products below, to find the desired product/products.
- EDIT/DELETE/ASSIGN/UNASSIGN Product: Besides each product, their Category is listed (in pink) and Sub-Category (in blue). All the product operations such as Edit Product, Delete Product or Assign/Unassign Product to Bar Counter/Counters can be done by Tapping the THREE DOTS on the right side of each product.
- Edit Product: You can change everything here such as Product Image, Product Name, Price, Product Description, Category, Sub-Category. Lastly, you can also toggle the button at bottom, if the product is alcoholic.
- Delete Product: Just delete the product and it would be no more in the products list.
- Assign/Unassign Product: Each product can be assigned to one or more Bar Counters by selecting the relevant Bar Counter/Counters. Also the product can be unassigned from one or more Bar Counters by deselecting the relevant Bar Counters/Counters.
- ADD Product (+ icon): Tap the + icon on bottom right. You would be taken to the ADD NEW PRODUCT page. Here you need to enter:
- Product name, Price. Product Description is optional.
- Category as DRINKS or FOOD and relevant Sub-Category.
- Product Image is mandatory. You wouldn’t be able to add products without the image.
- Also toggle the button at bottom, if the product is alcoholic.
- Finally tap the TICK icon to add the product.
CATEGORIES Tab
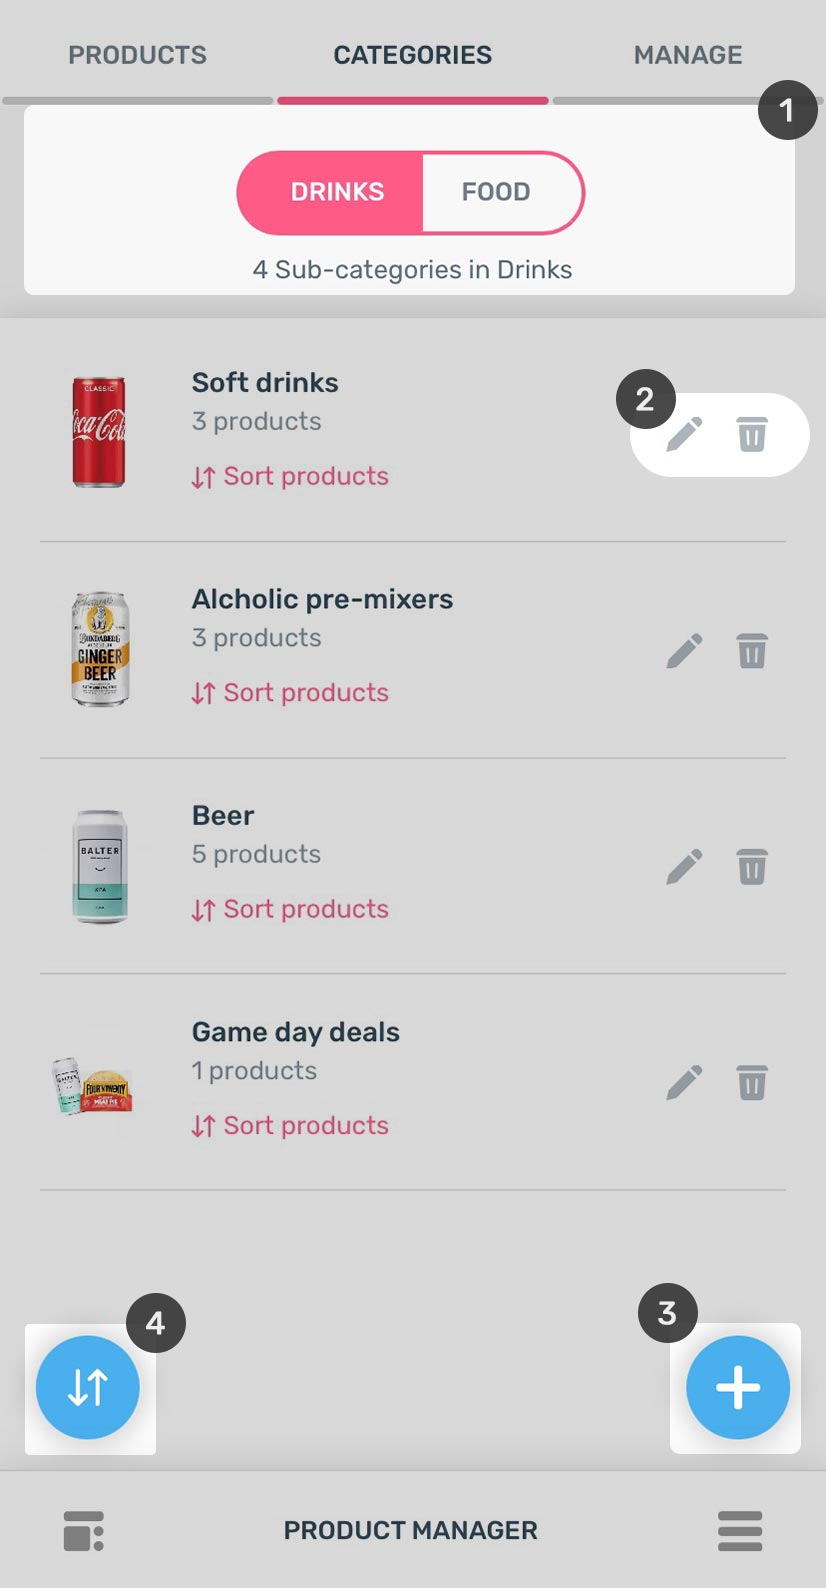
- The CATEGORY of products can be, either FOOD or Drinks only.
- FOOD
- DRINKS
- EDIT/DELETE/SORT Sub-Category: Besides each Sub-category, there are two icons on the right side for Editing Sub-Category, Deleting Sub-Category.
- Edit Sub-Category: You can change everything here such as Sub-Category Name, CATEGORY and Sub-Category Image.
- Delete Sub-Category: Just delete the product and it would be no more in the list.
- Sort products: To sort the products, there is a pink text below each Sub-Category which reads “Sort Products”. Tap this to sort products alphabetically or manually in that Sub-Category only.
- ADD Sub-Category (+ icon): Tap the + icon on bottom right. You would be taken to the ADD NEW SUB-CATEGORY page. Here you need to enter:
- Sub-Category title.
- Relevant Category (either FOOD or DRINKS).
- Product Image is mandatory. You wouldn’t be able to add Sub-Category without the image.
- Finally tap the TICK icon to add the Sub-Category.
- SORT LIST (⇅icon): Tap the ⇅ icon on bottom left. You would be taken to the SORT LIST page. Here you can:
- Order all the Sub-Categories alphabetically by tapping (↺icon) on the bottom left side of the page.
- Order Sub-categories manually by grabbing the “cross arrow” on the right side of each Sub-Category and moving it up or down as desired.
MANAGE Tab
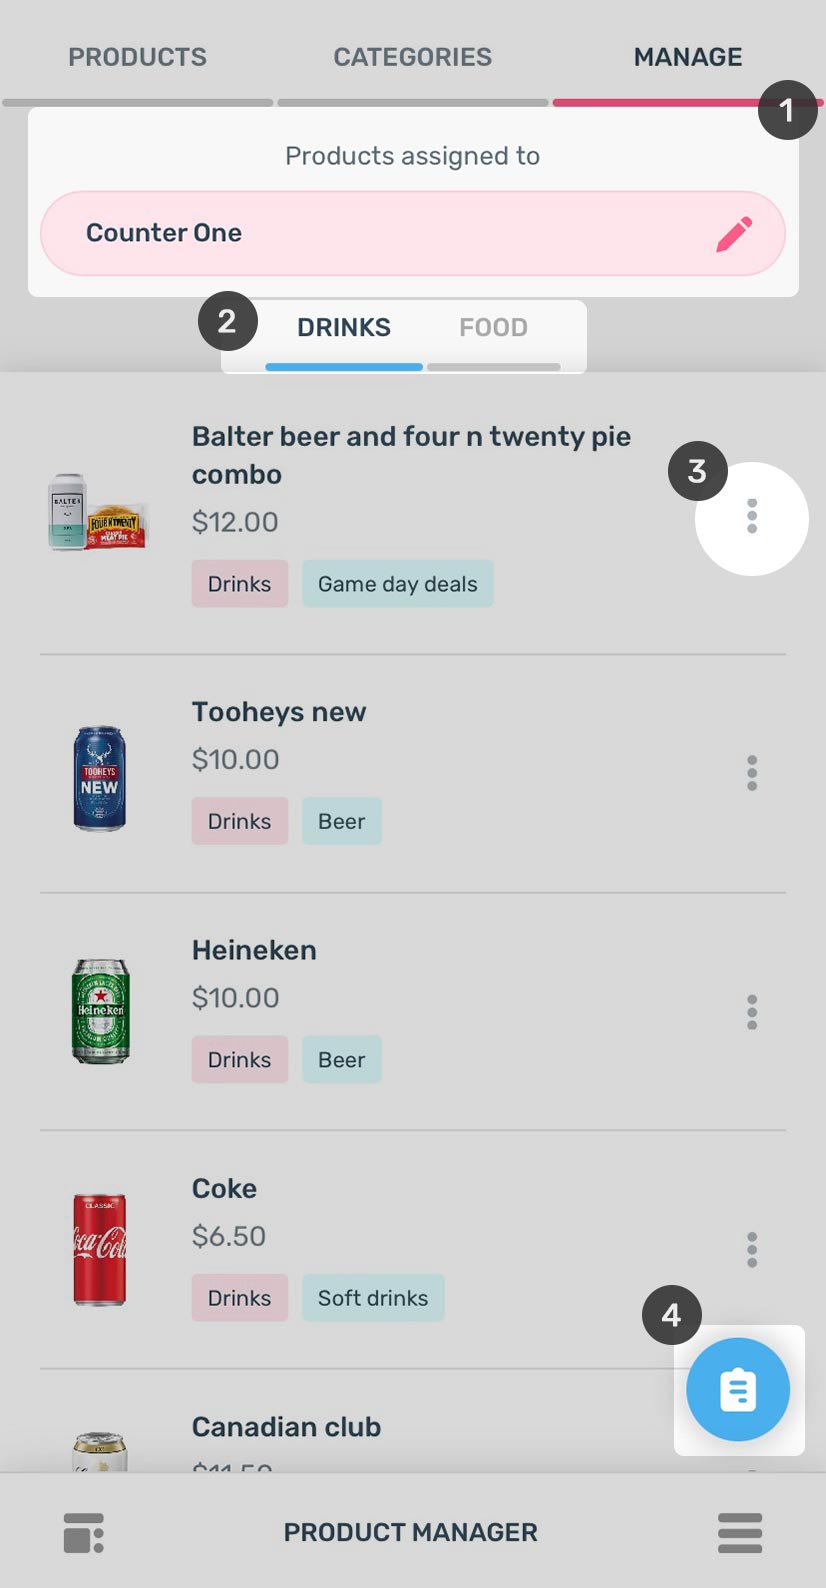
- SELECT any Bar Counter
- Tap on the Bar Counter selection box and the list of Bar Counters pops up.
- Select any Bar Counter e.g Bar Counter Four.
- SELECT Category (either FOOD or DRINKS) to display products from that Category.
- UNASSIGN/Out-of-Stock Product: Besides each product, their Category is listed (in pink) and Sub-Category (in blue). All the product operations such as Unassign Product from the selected Bar Counter, Mark the Product Out-of-Stock, can be done by Tapping the THREE DOTS on the right side of each product.
- ASSIGN Product to the Bar Counter: Tap the icon on bottom right of screen. You would be taken to the ADD PRODUCT TO COUNTER page.
- TYPE the product name or category name or sub-category name in the SEARCH BOX to find the desired product/products.
- SELECT product/products by Tapping the (✔) icon on the right side of each product. You can also select the whole list at once by tapping on the SELECT ALL icon on the bottom left of the screen.
- Once the product/products are selected, they are assigned to the selected counter by tapping the (✔) icon on the bottom right of the screen.
Bay Manager
The tasks that you can do in Bay Manager are:
- View the Bays assigned to a Bar Counter.
- Assign Bays to a Bar Counter.
Bay Manager has 2 Tabs:
- ASSIGNED Tab
- TO BE ASSIGNED Tab
ASSIGNED Tab

- SELECT any Bar Counter:
- Tap on the Bar Counter selection box and the list of Bar Counters pops up.
- Select any Bar Counter e.g Bar Counter Four.
- Name of the STAND: The Bays are grouped into various Stands. The name of the Stand is at the top of the grouped Bays.
- UNASSIGN Bays: You can unassign any Bay from a particular STAND and the selected Bar Counter by clicking the cross sign next to the Bay number.
TO BE ASSIGNED Tab
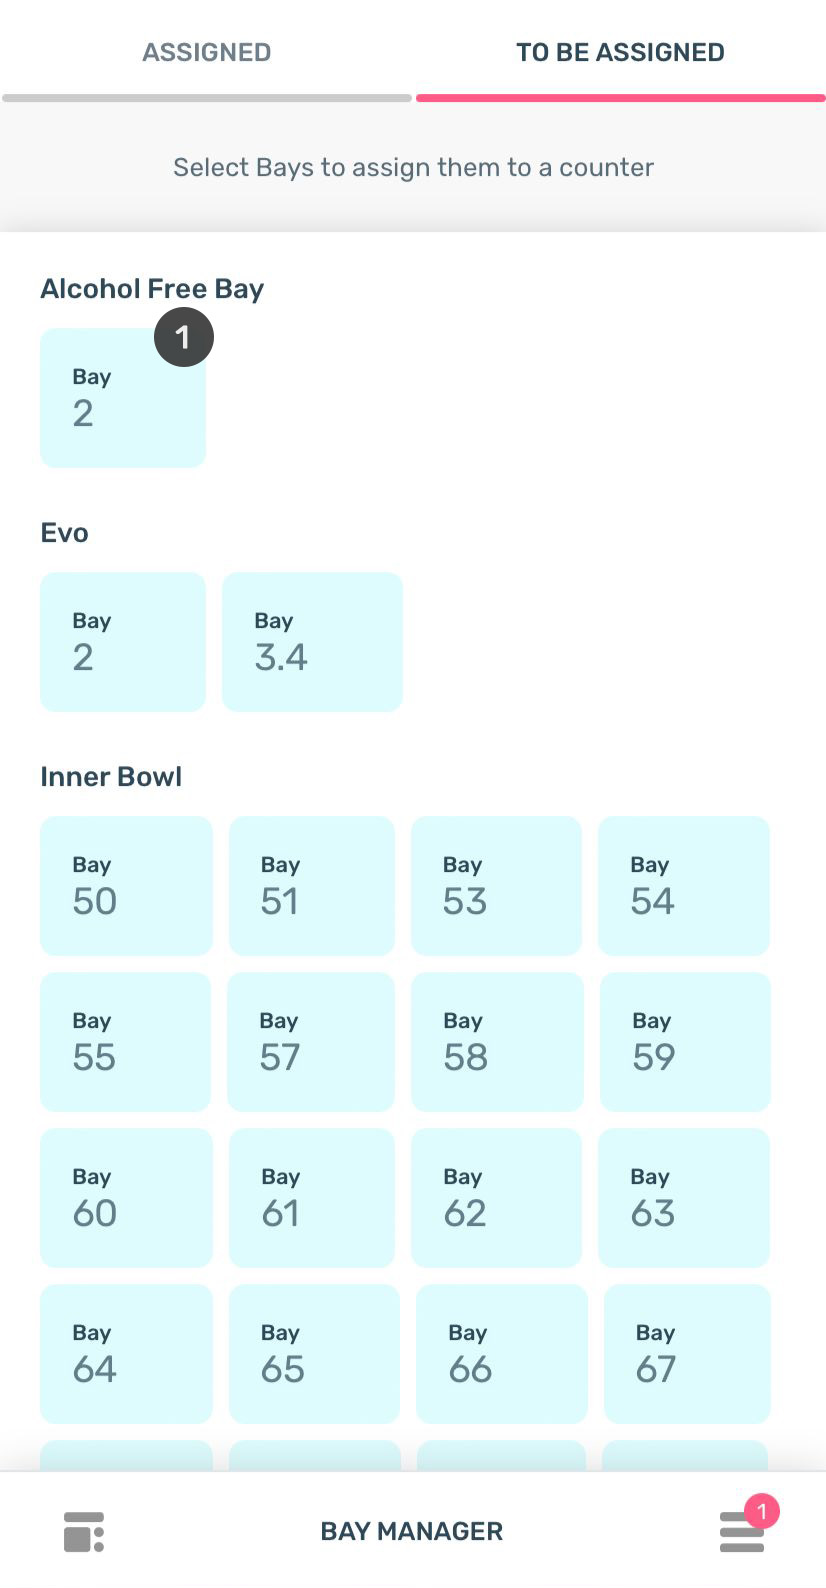
- SELECT any Bay in any STAND:
- Pop up appears asking Assign Selected Bays.
- When you click on Assign Selected Bays, there is a list of all the Counters.
- Assign the Bay to the required Counter.
Manage Counters
We have added SASS .scss files in template. If you know how to use SASS you can change sass files and compile the css as well.
You can find sass file here - HTML/assets/sass
Employee Manager
You can change your Website's Color Scheme in an instant. We have build 10 Color css file for change template primary color.
color-blue.css- Blue Colorcolor-brown.css- Brown Colorcolor-cyan.css- Cyan Color
Order Settings
We have include a Custom CSS File in the css Folder so that you can better handle your Customizations for New Styles or
Overwriting Default Theme Styles. Simply add all your Custom CSS Codes in the css/custom.css File and link it in the Document <head> after the css/stylesheet.css Linking. Also make sure that this is the Last Linked CSS File in the Document <head> so that your Custom CSS Styles are Overwritten properly.
General Settings
The Logo Container can be found in the Header Container - <header>
<!-- Logo -->
<a class="logo ml-3 ml-md-0" href="index.html" title="iDocs">
   <img src="images/logo-light.png" alt="iDocs"/>
</a>
<!-- Logo End -->
CRM App Documentation
Also known as Stadium App
Thank you so much for your patience...
- Version: 1.0
- Author: EvoMorf
- Started: 17 March, 2023
- Update: March, 2023
DASHBOARD
Documentation and examples for typography, headings, body text, lists, and more.
Headings
| Heading | Example |
|---|---|
<h1></h1> |
h1. Heading |
<h2></h2> |
h2. Heading |
<h3></h3> |
h3. Heading |
<h4></h4> |
h4. Heading |
<h5></h5> |
h5. Heading |
<h6></h6> |
h6. Heading |
ANALYTICS
Documentation and examples for displaying inline and multiline blocks of code
STADIUM CRUD
Documentation and examples for opt-in styling of tables.
iDocs is based on Bootstrap 4, so you can easily use Bootstrap's table classes to style your table. Bootstrap Documentation
Bordered
<table class="table table-bordered">
   .......
</table>| # | First | Last | Handle |
|---|---|---|---|
| 1 | Mark | Otto | @mdo |
| 2 | Jacob | Thornton | @fat |
| 3 | Larry | the Bird |
Striped
<table class="table table-bordered table-striped">
   .......
</table>| # | First | Last | Handle |
|---|---|---|---|
| 1 | Mark | Otto | @mdo |
| 2 | Jacob | Thornton | @fat |
| 3 | Larry | the Bird |
NoteYou can refer more information in Bootstrap Documentation here: Bootstrap Documentation
PAYMENTS
Font Awesome icon sets are used in iDocs.
<i class="fas fa-mobile-alt"></i>
<i class="fab fa-twitter"></i>
<i class="fas fa-credit-card"></i>
<i class="fab fa-facebook-f"></i>
NotePlease go to their official documentation pages for a full list of icons: Font Awesome
PROFILE
Documentation and examples for opting images into responsive behavior and add lightweight styles to them—all via classes.
DESIGN ELEMENTS
The selected DESIGN ELEMENTS required for eatfromyourseat.com documentation are as under:
Bigger Text Paragraph to stand out from the normal text.
Blue Colored Text BoldBlue Colored Text
Bold Link
Normal Link
Button
For Code or just to make text pinkNoteYou can refer more information in Bootstrap Documentation here:

Click Here for Popup Image
Click Here for Popup Image
Link with icon
Alert Box type. lets try two line text. Alert Box type. lets try two line text. Alert Box type. lets try two line text. Alert Box type. lets try two line text. Alert Box type. lets try two line text. Alert Box type. lets try two line text.
FAQ
A FAQ is a list of frequently asked questions (FAQs) and answers on a particular topic.
Source & Credits
Images:
- Unsplash - https://unsplash.com/
Fonts:
- Icons Font Face - https://fontawesome.com/
Scripts:
- jQuery - http://www.jquery.com/
- Bootstrap 4 - http://getbootstrap.com/
- Highlight Js - https://highlightjs.org/
- jQuery easing - http://gsgd.co.uk/sandbox/jquery/easing/
- Magnific Popup - http://dimsemenov.com/plugins/magnific-popup/